Showing posts with label Premiere Pro. Show all posts

Wednesday, May 12, 2010

Get The Buzz Out

Despite our best efforts, audio recorded in the field doesn't always live up to expectations. In this article, I'll demonstrate the process of cleaning up an audio track plagued with hum and noise.

In this first clip you can hear the audio in its camera original form. Lot's of audio hum and crackle - yuck.


So the first task is to try to eliminate the hum. Premiere Pro includes a notch filter to correct such problems. (A notch filter passes most frequencies unaltered, but attenuates those in a specific range to very low levels.) The key to successfully applying a notch filter is to identify the frequency of the offensive hum. The easiest way to do this is to apply the filter and then slowly sweep through the frequency range, previewing the effect after each adjustment. In this case the hum was predominantly located at 150 Hz.


That improved things a bit, but notice there is the hum is also present at a higher frequency range. The solution is to apply a second notch filter using the same technique. In this case the hum was present at about 310 Hz. Listen to the next example and think you'll notice that the hum is gone.


The next problem you may notice is the persistent crackle in the audio. It seems that the wireless mic system used to record the audio added this crackle as well. Premiere Pro includes an easy-to-use filter for this problem aptly named "DeCrackler". Like the notch filter, you can preview the filter will have on your audio and tweak the settings accordingly. In this case, the Threshold was set to 2% and the Reduction was set to 94%
.


Finally, there's a lot of airy noise present. Sure enough, there's a filter to correct this too - DeNoiser. In this case, I reduced the hiss 5dB. In this next clip you'll hear the cumulative effect each of the filters described above.


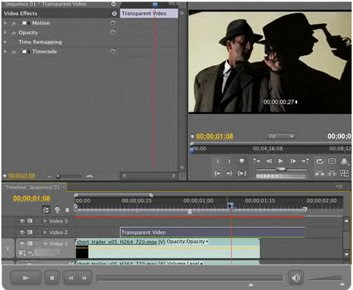
Here's a still which shows the filters that were used to fix this audio.


One thing to keep in mind when applying audio filters is listen to ensure the filter degrades your audio as little as possible. The point is to attenuate or remove the offensive noises without harming the sound you want to preserve.

To learn more about working with audio, check out Jay Rose's Audio Postproduction for Digital Video.

Tuesday, February 9, 2010

Keyboard Shortcut Customization

When working in Premiere Pro or just about any other Adobe application, it's very clear that being able to move nimbly between panels is a necessity. Although using the mouse does work, it can be pretty cumbersome. Here are the default Adobe keyboard shortcuts for the application panels:

Shift + 1 Project Panel

Shift + 2 Source Panel

Shift + 3 Timeline Panel

Shift + 4 Program Monitor Panel

Here's a link for all of them.

However I jump to and from these panels frequently so I substituted single-stroke keyboard
shortcuts to make things even simpler.

Remember that if you screw up, you can always restore the defaults.

Here's the link to Adobe Knowledge Base article on customizing keyboard shortcuts. Note that if you attempt to assign a key that already in use for another shortcut, the program will alert you to the conflict. From there, you may choose whether or not to reassign that key.

Here are the substitutes that I use:

F8 - Effects Panel

F9 - Source Monitor Panel

F10 - Program Monitor Panel

F11 - Project Panel

F12 - Timeline Panel


Saturday, January 2, 2010

A Worthy Wiki

When searching for solutions to problems with Adobe Premiere Pro, here's a good resource.


The PremiereProPedia isn't affiliated with Adobe. Rather is a user-generated site which provides a platform for Premiere Pro editors to share problems and solutions
.

If you have a problem and strike out searching Adobe's Knowledge Base, make sure to give this site a try.

Tuesday, November 3, 2009

Adobe's 64-Bit Commitment

You may have read about this elsewhere, but it's worth noting that future versions of Premiere Pro and After Effects will only run on 64-bit operating systems. In my view this is a smart decision by Adobe and should serve to make your work flow faster and better able to support HD video formats.

64-bit computing has been around a long time but Microsoft Windows and processors from Intel and AMD have matured to the point where upgrading to a 64-bit system is relatively affordable and bug-free.


Adobe boasts performancegains of up to 227%
using Adobe Premiere Pro CS4 on a 64-bit system
with more memory
.


But what are the advantages of 64-bit computing for video makers? The main advantage is performance.

Adobe notes in its FAQ: "With a 64-bit operating systems you get a wider address system and data path, providing access to essentially unlimited RAM. On 32-bit systems, each application is limited to 4GB of RAM (and in practice this number is actually smaller). More RAM means applications can manipulate larger chunks of data, cache more information, and handle a wide range of tasks more efficiently."

At EventDV, Jan Ozer documents the performance gains, "...the 64-bit system was 67% faster on my standard DV test file, up to 63% faster on HDV-related tests, up to 50% faster on AVCHD tests, and up to 227% faster on tests using footage from the RED camera."

Now with the new release of Windows 7, 64-bit computing looks even more promising. Microsoft received nearly universal and well-deserved atomic dope slaps for its awful Vista operating system. However, having recently installed and worked with Windows 7, I'd say things are looking up. I'm in the process of building a new computer build based on the Videoguys DIY-7 specifications. I'll follow up with a review after I've tested this 64-bit monster.

Tuesday, May 12, 2009

Ripple Delete

Here's a quick and clean way to delete a clip from the Premiere Pro timeline without leaving a gap.

Select the clip to be deleted. Hold down the ALT key and press the BACKSPACE key.

The clip will be deleted and everything to the right of the the deleted clip will move to fill the space.
Instant ripple delete.

Monday, March 9, 2009

Premiere Pro 2.0: Clip Notes

Here's a tutorial by Digital Media Net's Charlie White on a helpful feature introduced in Premiere Pro 2.0. Clip Notes enables you to export your sequence as a PDF document which can be emailed for comments by the viewer. It's very handy when working with a client or collaborator.

Here's Adobe's word on Clip Notes:

Getting fast, to-the-point feedback from clients is a crucial part of successful production, but it can also be a time-consuming chore. Adobe Clip Notes streamlines the process with an elegant solution based on two easy, accessible technologies: e-mail and Adobe PDF.

Export a video sequence as an Adobe PDF file with embedded or streamed video, and then e-mail the file to your reviewer. The reviewer plays the video with Adobe® Reader® and enters timecode-specific remarks into the comment box. After the reviewer e-mails back the comments and you open the file in Adobe Premiere® Pro CS4 software, the comments appear as clip markers at the appropriate timecode locations in the timeline.


Wednesday, February 11, 2009

Synthetic Media In Premiere Pro

It's good to see that Layers Magazine finally began offering Premiere Pro tutorials about six months ago. In this tutorial, Franklin McMahon demonstrates the uses of media created within Premiere Pro.


The tutorial demonstrates how and why to use transparent video in your timeline. Also note that in Premiere Pro CS4 color mattes support an assortment of blending modes which opens up some visual possibilities. (Here's a link to information on blending modes and what they do.)

Thursday, January 8, 2009

Trim Operations Tutorial

Here's a useful tutorial from Talented Pixie on efficient ways to rearrange or trim clips within the Premiere Pro timeline.


Host Tom Mavro-Michaelis reviews ripple edits, rolling edits and keyboard shortcuts to quickly change the order of clips in a sequence. Understanding how to use these tools can really speed the edit process along. And while the tutorial is targeted at Premiere Pro CS3 users, the techniques presented apply to every version of Premiere Pro.


Tuesday, December 16, 2008

Capture Tutorial And More

Here's a short, competent tutorial on capturing DV footage using Premiere Pro CS3. It was produced by Talented Pixie, a firm which produces tutorials for Apple and Adobe software.


If you're in the market for tutorial materials, I recommend Total Training and Lynda.com. While both offer online tutorials I think those offered by Total Training are a little slicker and well-produced. That's no slight against Lynda.com though.

Also each requires a paid subscription. In this case Lynda.com's approach is preferable because it offers a monthly subscription plan, while Total Training offers only annual plans.

On the subject of tutorials, if you're in to Photoshop be sure to check out the National Association of Photoshop Professionals (NAPP). More than any other site, they're really figured out how to offer a value-packed membership at an affordable annual membership fee. In fact, if you are a regular B&H Photo customer, the NAPP membership will pay for itself quickly since one of the membership benefits is free standard shipping on B&H orders.

Finally, check out Kelby Training for digital photography instruction. These are basically the same folks that run NAPP but there are more in-depth tutorials on photography and lighting (and a lot more) that are very well done.

Thursday, December 4, 2008

Premiere CS4 - Pros and Cons

Here's an article by Scott Simmons of The Editblog. He takes a thorough and critical look at Premiere Pro CS4's efficacy in a professional environment.

For me, the most valuable insight was raising its media management deficiencies. This won't affect all editors the same way but locating a project's missing media in Premiere Pro has long been a challenge. Although as the article points out, Final Cut Pro suffers from the similar problems.

Tuesday, October 14, 2008

Video Introduction to Premiere Pro CS4

Here's an informative tour of Premiere Pro CS4 by Adobe's Senior Business Development Manager for Video and Imaging Products, Dave Helmly. You can check out his blog, DAV’s Tech Table here.

The video demonstrates Premiere Pro CS4's support for AVCHD as well as the application's tight integration with After Effects and Adobe Encore.

Sunday, October 12, 2008

Write On Tutorial

Here's another helpful tutorial from Jeff Schell of Digital Media Network.


In this presentation, Jeff demonstrates how to use Premiere Pro's Write On effect to trace a traveler's progress across a map.

Wednesday, October 8, 2008

Premiere Pro CS4 Highlights

Here's the lowdown on the latest iteration of Adobe Premiere Pro CS4. You can review Adobe's PDF on the subject here. Now that Premiere Pro supports AVCHD, I expect that Premiere Elements won't be far behind.

If you're in the market, the knowledgeable Videoguys are running a great upgrade special on the Matrox RTX.2 LE bundled with Premiere CS3. You get CS4 when it's released at no extra charge. (No I don't get any kickbacks from Videoguys. I just like working with vendors who know their stuff and treat customers as humans.)


  • Tapeless camera support
    Edit video natively in the latest tapeless formats, including AVCHD, P2, XDCAM EX, and XDCAM HD, without transcoding or rewrapping. Browse your drives and removable media from inside Adobe Premiere Pro to find, log, and import footage.

  • Batch encoding in the background
    Save time with Adobe Media Encoder, a separate included software application that automates the process of creating multiple encoded versions of your source files and sequences. Manage priorities and control advanced settings for individual files.

  • Dynamic workflow with other Adobe tools
    Achieve a high level of productivity from production to delivery with the tightly integrated toolset in Adobe Premiere Pro CS4. Eliminate intermediate rendering when moving sequences into Adobe Encore CS4 software, and take advantage of new support for Adobe Photoshop files with video and blend modes.

  • Direct-to-disk recording with cross-platform, redesigned Adobe OnLocation CS4
    Get critical monitoring information while you record directly to disk with Adobe OnLocation CS4 software, now cross-platform with a new Adobe-standard interface. Save time and take the tedium out of logging with shot lists and metadata-based project intelligence.

  • End-to-end metadata workflow
    Easily add metadata to clips both on set with Adobe OnLocation and while editing using Adobe Premiere Pro, for greater project intelligence. Use speech recognition technology to create text-based metadata that helps you organize and find your assets more efficiently during editing. Finally, pass the metadata through export for publishing to the web, enabling searchable video and helping to unlock new revenue streams.

  • Editing efficiency
    Take advantage of more than 50 of the most requested editing enhancements to make your workflow more efficient. Apply effects to multiple selections, get timecode information faster, speed work in the timeline with new keyboard shortcuts, and more.

  • Speech Search
    Turn spoken dialogue into text-based, timecode-accurate, searchable metadata. Jump to a specific area of a shot by searching for keywords within the dialogue, and then use keywords to quickly locate and display what you’re looking for—or even cut video based on the script.

  • Faster, customizable SWF output
    Create SWF file versions of your DVD and Blu-ray projects for the web, complete with DVD interactivity, menus, URL links, and customizable HTML templates, without opening another application. Export for streaming or progressive download, and reduce encode time by using optimized encode settings in Adobe Media Encoder.

  • Resource Central
    Access product-related news and tutorials online by using the Resource Central panel in Adobe Premiere Pro and Encore.

Wednesday, September 3, 2008

Importing Still Images In Premiere Pro CS3

In this video podcast, the Digital Media Network's Jeff Schell demonstrates how to work with images that are larger than the frame size of your project.


Jeff created 26 podcast tutorials for Premiere Pro CS3. You can them out at his blog.

Monday, August 25, 2008

Adobe Premiere Pro Keyboard Shortcut Of The Week

Slip or slide edits are used when you need to to edit a clip in a sequence while keeping the overall duration of the clips constant.


Here's and excerpt from Antony Bolante's “Adobe Premiere Pro 1.5 for Windows: Visual QuickPro Guide” which explains how to use slip and slide edits.

The keyboard shortcut for the Slip tool is "Y".


Monday, August 11, 2008

Speech-To-Text Revolution on the Way?

Here's an article by Jan Ozer from eventdv.net on a new feature to be included with Adobe Premiere Pro CS4.

Predicting that Premiere Pro CS4 will be out in early 2009, Ozer writes: "the most significant addition to Premiere Pro is a new speech-to-text function that will revolutionize how video is edited and watched within 6 months of CS4’s ship date."

What is Speech-To-Text? It's an application that can process recorded speech and produce text. With the exception of a few applications which have to be "taught" one's vocal patterns in order to accomplish this, one typically had to manually type or hire a service to produce transcriptions of interviews or speeches. And transcription services aren't cheap.

Ozer predicts: "speech-to-text is such a sufficiently 'disruptive' feature that it will change editing and streaming preferences." He reasons that with the ability to include the transcription as metadata, "A formerly featureless lump of video is transformed into a scanable, searchable object".

Adobe already includes this feature in the beta release of Soundbooth CS4. I haven't had time to work with it, but for the type of work I do, a functional speech-to-text application would save a great deal of time and money.


Why Upgrade to Premiere Pro CS3?

Once you've committed to an application, weighing the benefits of each new software upgrade becomes an inevitable part of the process.

One issue to consider with software upgrades is to determine the resources the new application will demand. Software "bloat" can drag your once perky system down to a crawl. It's not unusual to need a RAM or even processor upgrade in order to run the latest version of piece of software. And in some cases, the "upgrade" can represent a step backwards. (Read the excellent Videoguys for their take on upgrading to Windows Vista.)


I'm happy to report that upgrading to Premiere Pro CS3 is exactly that - an upgrade. Of course there is an improved feature set for the application. For instance, a very good Time Remapping feature and the addition of H.264 codecs. The upgrade also includes Adobe Encore CS3 for DVD authoring and Adobe OnLocation, a direct to disk recorder. A complete overview of new and improved CS3 features can be found here.

However, the genuine surprise was to see that the application ran faster and in a more stable fashion than Premiere Pro 1.5 on the exact same machine. Nice job, Adobe.


Tuesday, August 5, 2008

Multi-Camera Editing In Premiere Pro

Multi-camera editing has been a Premiere Pro feature since version 2.0.

You can use the Multi‑Camera Monitor to edit footage from multiple cameras, simulating live camera switching. You can edit footage from up to four cameras using this technique. For event videographers, this can be a huge time-saver.

Here's a video from Creative Cow's
Aanarav Sareen on multi-camera work flow in Premiere Pro.


Wednesday, July 16, 2008

Adobe Premiere Pro Keyboard Shortcut of the Week

It's been a while since I've posted one of these so here goes. The Track Select tool enables you to select all clips that exist on and after a certain time on one track, and then slide them to a new location in the timeline.


It's also good to know that by holding down the shift key, the tool selects the clips in all the tracks from that point.

The keyboard shortcut to access this tool is "M".


Monday, July 14, 2008

Color Correction Using Premiere Pro

Here's another video tutorial from studiodaily.com on basic color correction in Premiere Pro.


To learn more about color correction, I suggest you check out Stu Maschwitz's blog, Prolost. In this post, he demonstrates how flesh tones can be preserved while applying radical color changes to the rest of the shot.