
Showing posts with label keyboard shortcut. Show all posts
Showing posts with label keyboard shortcut. Show all posts
Tuesday, September 24, 2013
Wednesday, September 7, 2011
Premiere Pro Keyboard Shortcut of the Week
Well it may be the keyboard shortcut of the month or year but whose counting?
Here it is. If you want to expand a panel to full screen, hover the mouse pointer over that panel and press the tilde (~) key.

Tuesday, February 9, 2010
Keyboard Shortcut Customization
When working in Premiere Pro or just about any other Adobe application, it's very clear that being able to move nimbly between panels is a necessity. Although using the mouse does work, it can be pretty cumbersome. Here are the default Adobe keyboard shortcuts for the application panels:
Shift + 1 Project Panel
Shift + 2 Source Panel
Shift + 3 Timeline Panel
Shift + 4 Program Monitor Panel
Here's a link for all of them.
However I jump to and from these panels frequently so I substituted single-stroke keyboard shortcuts to make things even simpler.
 Remember that if you screw up, you can always restore the defaults.
Here's the link to Adobe Knowledge Base article on customizing keyboard shortcuts. Note that if you attempt to assign a key that already in use for another shortcut, the program will alert you to the conflict. From there, you may choose whether or not to reassign that key.
Here are the substitutes that I use:
F8 - Effects Panel
F9 - Source Monitor Panel
F10 - Program Monitor Panel
F11 - Project Panel
F12 - Timeline Panel
Shift + 1 Project Panel
Shift + 2 Source Panel
Shift + 3 Timeline Panel
Shift + 4 Program Monitor Panel
Here's a link for all of them.
However I jump to and from these panels frequently so I substituted single-stroke keyboard shortcuts to make things even simpler.
Remember that if you screw up, you can always restore the defaults.Here's the link to Adobe Knowledge Base article on customizing keyboard shortcuts. Note that if you attempt to assign a key that already in use for another shortcut, the program will alert you to the conflict. From there, you may choose whether or not to reassign that key.
Here are the substitutes that I use:
F8 - Effects Panel
F9 - Source Monitor Panel
F10 - Program Monitor Panel
F11 - Project Panel
F12 - Timeline Panel
Tuesday, May 12, 2009
Ripple Delete
Here's a quick and clean way to delete a clip from the Premiere Pro timeline without leaving a gap.
Select the clip to be deleted. Hold down the ALT key and press the BACKSPACE key.
The clip will be deleted and everything to the right of the the deleted clip will move to fill the space. Instant ripple delete.
Select the clip to be deleted. Hold down the ALT key and press the BACKSPACE key.
The clip will be deleted and everything to the right of the the deleted clip will move to fill the space. Instant ripple delete.
Monday, August 25, 2008
Adobe Premiere Pro Keyboard Shortcut Of The Week
Slip or slide edits are used when you need to to edit a clip in a sequence while keeping the overall duration of the clips constant.

Here's and excerpt from Antony Bolante's “Adobe Premiere Pro 1.5 for Windows: Visual QuickPro Guide” which explains how to use slip and slide edits.
The keyboard shortcut for the Slip tool is "Y".

Here's and excerpt from Antony Bolante's “Adobe Premiere Pro 1.5 for Windows: Visual QuickPro Guide” which explains how to use slip and slide edits.
The keyboard shortcut for the Slip tool is "Y".
Wednesday, July 16, 2008
Adobe Premiere Pro Keyboard Shortcut of the Week
It's been a while since I've posted one of these so here goes. The Track Select tool enables you to select all clips that exist on and after a certain time on one track, and then slide them to a new location in the timeline.

It's also good to know that by holding down the shift key, the tool selects the clips in all the tracks from that point.
The keyboard shortcut to access this tool is "M".

It's also good to know that by holding down the shift key, the tool selects the clips in all the tracks from that point.
The keyboard shortcut to access this tool is "M".
Wednesday, June 18, 2008
Adobe Premiere Pro Keyboard Shortcut of the Week
Here's the quick way to access the Clip Speed/Duration dialog box. Make sure the clip that you want to change is selected and press "CTRL" and "R".

This dialog box will appear:


This dialog box will appear:

Wednesday, June 11, 2008
Adobe Premiere Pro Keyboard Shortcut of the Week
In a past tip, I showed how to use the keyboard as transport controls to scan forward, backward or to pause a clip. In the capture window, there are additional controls available.
 When connected to a VTR or tape camcorder, the "S" key stops the deck, the "R" key rewinds, and the "F" key fast forwards.
 When connected to a VTR or tape camcorder, the "S" key stops the deck, the "R" key rewinds, and the "F" key fast forwards.
Wednesday, June 4, 2008
Adobe Premiere Pro Keyboard Shortcut of the Week
Now that we know the shortcut to clear the in point and out point of a clip, (Remember? It's the "G" key.) How do you remove either the in point or the out point?
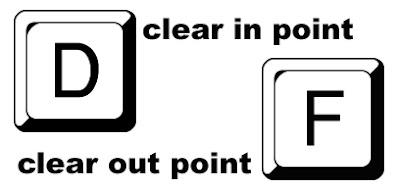
That's right. "D" clears the in point and "F" clears the out point.
That's right. "D" clears the in point and "F" clears the out point.
Sunday, June 1, 2008
Adobe Premiere Pro Keyboard Shortcut of the Week
We know the shortcuts for selecting in and out points on a clip. (Remember? The "I" and "O" keys.) But how do you clear them?
 Press the "G" key. This works in the timeline, source window or program window.
 Press the "G" key. This works in the timeline, source window or program window.
Thursday, May 22, 2008
Adobe Premiere Pro Keyboard Shortcut of the Week
Here's the easy way to advance the CTI (Control Time Indicator) forward one frame.

Press the right right arrow key step forward one frame. Press the left arrow to step back one frame.


Press the right right arrow key step forward one frame. Press the left arrow to step back one frame.

Wednesday, May 14, 2008
Adobe Premiere Pro Keyboard Shortcut of the Week
Here's the fast way to jump to the beginning or end of a sequence in your timeline. To go to the start, press the "Home" key. To jump to the end, press the "End" key.

You can also apply these shortcuts in the Source Monitor to jump to the beginning or end of a clip.

You can also apply these shortcuts in the Source Monitor to jump to the beginning or end of a clip.
Wednesday, May 7, 2008
Adobe Premiere Pro Keyboard Shortcut Of The Week
Here's the simplest way to select a video track in your timeline. Hold down the CTRL key and use the "+" key to move up a track or the "-" key to move down a track.
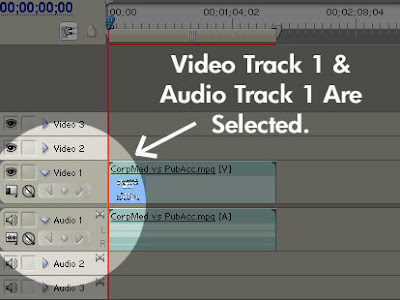
Targeting a different audio tracks is easy too. Adding the shift key to the either of the commands above [Shift CTRL +] or [Shift CTRL -] will quickly move you through the audio tracks in your timeline.

Targeting a different audio tracks is easy too. Adding the shift key to the either of the commands above [Shift CTRL +] or [Shift CTRL -] will quickly move you through the audio tracks in your timeline.
Saturday, April 26, 2008
Adobe Premiere Pro Keyboard Shortcut of the Week
In Premiere Pro and Premiere Elements, the work area defines a portion of the timeline for preview purposes. Hitting the enter key activates playback from the beginning of the work area bar to the end. Any rendering necessary to play that segment is also performed.
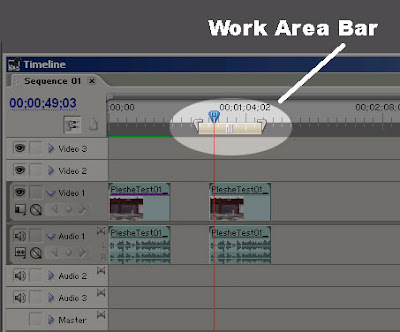
There are several ways to set the work area bar. The most cumbersome is to drag both the in and out point of that bar to the desired location. The fast and easy way is to place the CTI at the desired start of your work area and press "Alt" + "[". And you guessed it, to set the end point of the work area, press"Alt" + "]".
You can set also the work area bar by zooming into to the desired view of the timeline and then double-click the work area bar. The bar will automatically fill the current view of the timeline.
Saturday, April 19, 2008
Keyboard Shortcut of the Week
While this isn't a shortcut specifically for Adobe Premiere Pro, it does apply to every version of Windows since 3.1.
 By holding down the "ALT" key and pressing "TAB", you can automatically switch to other open programs on your Windows computer. If you have several open at the same time, repeatedly pressing the "TAB" key will allow you to cycle to the program you wish to switch to.
This comes in very handy when for example, you need to quickly switch between Premiere Pro and Adobe Audition.
Tuesday, April 8, 2008
Adobe Premiere Pro Keyboard Shortcut Of The Week
The simplest way to move clips from the trim window to the timeline is to press the "comma" key.

The "," key inserts your clip at the location of your CTI (Current Time Indicator) in the selected video track. Note that if the CTI is located on a clip, that clip will be split at that location with the new clip inserted there.

The "," key inserts your clip at the location of your CTI (Current Time Indicator) in the selected video track. Note that if the CTI is located on a clip, that clip will be split at that location with the new clip inserted there.
Wednesday, April 2, 2008
Adobe Premiere Pro Keyboard Shortcut of the Week
Here's the quick way to jump to the razor tool. Just hit the "C" key.

The razor tool comes in handy when you need to split or trim a clip within the sequence timeline. By holding down the "ALT" key, you may split only the video or audio portion of a clip with the razor tool.

The razor tool comes in handy when you need to split or trim a clip within the sequence timeline. By holding down the "ALT" key, you may split only the video or audio portion of a clip with the razor tool.
Friday, March 28, 2008
Adobe Premiere Pro Shortcut Of The Week
The letter "v" selects the most often used tool in Premiere, the Selection tool. (It's also the default tool when the application is launched.)
 This works in every desktop version of Premiere.
 This works in every desktop version of Premiere.
Wednesday, March 19, 2008
Adobe Premiere Pro Keyboard Shortcut of the Week
Technically this isn't a keyboard shortcut but it is a technique that can save oodles of time, so here goes.
It's quite common to apply video filter, audio filters or make other adjustments to a clip in the timeline. And if other clips in your timeline were taken from the same source, one often needs to apply identical filters and settings to those clips too. However, manually applying each of those settings is tedious.
Here's a way to copy the attributes of a clip and apply to any other clip in the timeline.
First, right-click on the clip that has all of the filters and adjustments applied to it and select "Copy". Then right-click on an unaltered clip in the timeline and select "Paste Attributes".
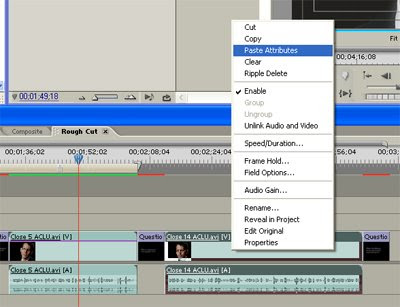
All of the filters and settings copied from the original clip are now applied your target clip.
Tuesday, March 4, 2008
Customize Your Shortcuts
In Premiere Pro and Premiere Elements, you can add to or customize the keyboard shortcuts you use. To do this, go to the menu and select Edit > Keyboard Customization...
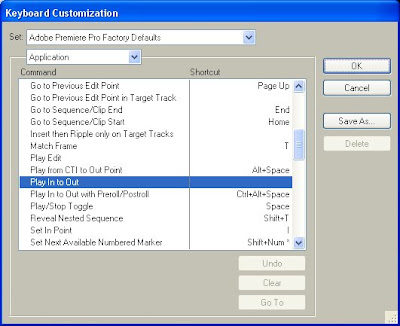
Every keyboard shortcut is identified there. Notice that if no shortcut is listed in the right column, then that function lacks a keyboard alternative. However, if you find an application function you use a lot and would like to add a shortcut, you can do that too.
For instance, I find that I often like to play clips or my timeline from the In point to the Out point. However, there is no shortcut in the default settings.
To do this, identify the function in the customization window and click in the blank space of the adjacent right column until a cursor appears. (I've found that initially, you have to click in the space, wait a second and then click again.)
Now enter your preferred keyboard shortcut. This may be obvious to some, but you need to enter the actual keyboard shortcut in the indicated cell. For example, if your shortcut includes the space bar, don't type the word, "SPACE BAR". Instead, press the space bar.
Now hit "Enter". Click on the "Save As" button and name your customized settings. Now you're ready to go.
I chose "Shift+Space" as my shortcut for play In point to Out point. Note that if you try to apply a shortcut that's already assigned, Premiere will ask whether you want to reassign the shortcut or undo and select another.
Subscribe to:
Posts (Atom)